Friday, December 11, 2009

Christmas Truffles, Part 2


That's right, Annie, they're Christmas trees!

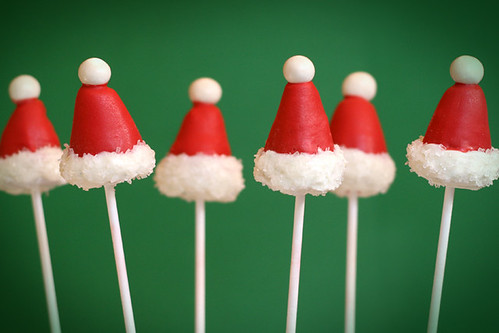
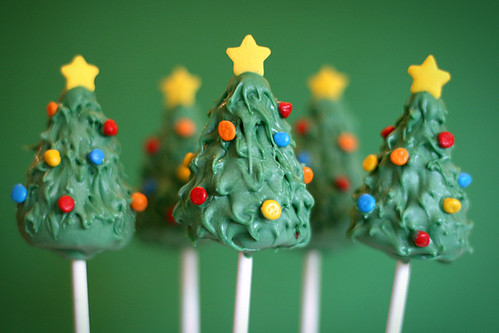
 Again, credit must go to Bakerella as I got the idea from her.  Here is where I got my inspiration:


So cute!  As you can tell, mine are a little bit...heftier.  Also, her ornaments and topper are more to scale, but she is the pro after all.

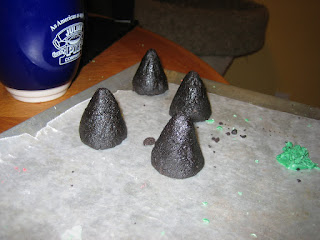
Again, I choose to leave off the stick.  The process starts the same way as with the hats:  Make cones:


Melt chocolate:


And then dip!  Nothing fancy this time, because it is all one color.  To do this I used a bamboo skewer through the bottom (about halfway through).  After dipping, use a toothpick to make the "branches":  You can either work fast and do it while the coating is still wet, or you can add them later.


Once the chocolate has hardened, twist the skewer to loosen and then remove.  Be sure to plug the hole left by the skewer, or it will leak.  

Finding toppers and  "ornaments" was kind of difficult.  Were I to do these again, I would use the rainbow chip sprinkles like Bakerella suggested.  Instead, I used these little guys:


I like the colors of these, and I like their shape, but they are just too big I think.  For the topper, I used a star sprinkle-- if I could find the jumbo ones Bakerella used, I would have preferred them.  I really like the effect they had.


Even though they aren't quite as cute as Bakerella's, I think they turned out rather well, especially when paired with the little hats from Part 1:


Aww!  Success!  I hope my coworkers like them!


Thursday, December 10, 2009

Christmas Oreo Truffles Part 1


These little cuties are for my office pot-luck next week, and they are inspired by the wonderful Bakerella.  First and foremost, the recipe:  Oreos, cream cheese, and chocolate.  How could one possibly go wrong?!

Secondly, the design:


I absolutely love these adorable Cake Pops that Bakerella whipped up, but the sticks can be cumbersome so I decided to modify the design and do them without the sticks.  Starting out I knew that mine could never be as adorable (or photographed as well!) as hers, but I did not let that dissuade me.


First you take the oreo and cream cheese mixture and form it into cones.


Once they are all shaped, freeze them until firm.


Melt some white melting wafers and dip the wide end of the cones into the chocolate, about 1/4 of the way up.  Shake off any excess chocolate and allow to dry.  I did this by making little foil supports to hold them upside down while the chocolate set.


Once the chocolate is completely set, melt some red wafers and dip the remaining exposed truffle into it.  Be sure to cover every seam!  Set right-side-up to dry.


While the red chocolate is still a little wet, place a small white candy on the top.  I used gumballs, but any candy will work so long as it is approximately round.


Finally, using a toothpick or knife, spread a thin coat of white chocolate over the bottom part of the hat (over the part of the sides already dipped in white chocolate--leave the bottom dry) and roll in sanding sugar to get that "fluffy" effect.


All done!


These were a little putzy, but they didn't take terribly long to make.  I made the cones last week and just kept them in the freezer until I decided to dip.  The covering and decorating process took less than an hour altogether.

I feel like even if they were tedious, the time investment really shows.  I would love to package these up in little boxes with bows-- how cute for the holidays! Stay tuned for Part 2!

Saturday, November 21, 2009

Giant Cupcakes

As I am sure you were able to figure out, today's order was for Giant Cupcakes.  10 of them to be exact.  In addition, it was decided that the bottom of the cupcakes would look much fancier/cleaner if I did a chocolate molded "liner" for them (see photos below).


This is the cupcake shown on the Giant Cupcake pan box
 As you can see, the bottom of the cupcake is unfrosted.
This not only means it will go stale very quickly, but it is also much messier to work with.


This cupcake and liner are from Oh Sugar Cakes.
       (Notice how much cleaner the bottom looks.)

Anyway, we decided that I was to make 10 cupcakes with candy liners.  This was a very tedious process, because I only had one pan, which I needed to make each liner (one at a time) and each cake (one at a time).


This pan, while neat, I was sure was going to be the death of me.  Because one side of the pan is conical and one is cylindrical, one side has far less batter and thus is done much sooner than the other.

If I had one note to Wilton it would be to split the pan in half so that when the top is done you can just take it out instead of having to wait for the bottom to finish baking.  I fear the only way to get a perfectly baked cake from this pan is to fill only half of it at a time and bake until done, then fill the other half and bake.  Because I was making 10, this was not a practical option for me.

Also, I think Wilton should consider down-sizing the pan to 4.5 cup capacity (the size of a standard cake mix and most standard cake recipes) instead of the 6 cups it currently holds.  That amount is rather strange, and necessitates multiplying every recipe by 1.5-- again, not a step I really wanted to deal with.

Anyway, less griping and more baking!

The first thing I had to do was make the 10 liners.  These cakes were to be centerpieces for a baby shower whose colors were pink and green (a lovely combination).  I was going to be making two flavors of cupcakes, 6 chocolate and 4 vanilla, so I made 6 pink liners and 4 green ones.  I wish I had taken pictures of all of the liners empty, but I was far too aware that I had 12 hours of work to do and only one night to do it.  Here is another picture of the first one I made, though:


To make the liners, I found that melting wafers were by far the best choice.  Specifically designed for melting, they are already evenly-portioned and come in a variety of colors.  To get this bubble-gum pink, I melted white and hot pink wafers together at a ratio of 2:1.  For the green, I didn't need to adjust the color at all:


Sorry it's blurry-- I was in desperate need of sleep when this was taken.  Anyway, I got these chocolate melting wafers from my local cake supply store (although they are not labeled, I believe they are Merckens brand).  I know Wilton also sells them, although I prefer these because I find them easier to work with.

For each candy liner I used 3/4 of a pound of candy, although I think a full pound would have made them sturdier.  For an excellent tutorial on how to make them, I highly recommend the one from Oh Sugar!.

So after managing to make 10 acceptable liners (after a few re-dos), I had to bake the cakes.  I worked with modified cake mixes (additional chocolate in the chocolate ones, and the addition of vanilla and sour cream to both varieties).  This was primarily for consistency's sake, along with the fact that I was in a time crunch.

Because this pan is deep and thin rather than shallow and wide, it baked like a bundt (read: longer), and, as previously mentioned, the bottom side took much longer to bake than the top.  After a few attempts to remove the top while keeping the bottom in the pan (with mixed results), I just resigned myself that the tops would be slightly overdone.  This isn't necessarily a terrible thing, as they needed to hold their shape which can be difficult with the fluffy texture of cake mix cakes.  None of them were burned, so I am hoping that they will be ok.  These were primarily for display purposes, though they were going to be raffled off at the end of the shower for people to take home and (presumably) eat.

As previously mentioned, I made 6 chocolate and 4 white cakes.  The chocolate were placed in pink liners and the white in green.  Before putting the cake inside the chocolate, ensure that they are completely cooled!  Hot cake melts chocolate!  I was getting impatient toward the end, and because of that I ended up having to do some patching when the softened chocolate started to tear.

Because the chocolate molds were made in the same pan as the cakes, the cakes had to be trimmed so they could fit inside.  This made quite a mess, but now I have a ton of leftover cake for cake balls or something similar.

Frosting/decorating was an interesting challenge.  Most of the decorations I have are not appropriate for such large applications-- they just disappear into the mass of frosting.  I ended up settling with an assortment of a few different decorating techniques.  I think the polka-dots are my favorite, but the pink flowers are nice, too.  There are also a couple decorated in pink and green sanding sugar, but I forgot to get a picture.  


In all, it took over 18 hours but I am happy with the results.  If I were to do these again, I would make sure to get oversized sprinkles and decorations, so that I wouldn't be so limited in design.
(The polka-dots are just melting wafers-- the perfect size!)


Wednesday, November 11, 2009

Preview

As the title implies, this is just a preview of what is to come.  I am going to say no more than that it is for a November 21st order, and it involves a giant chocolate mold shaped like this:


The rest will have to be left up to your imagination for now.  But trust me, this is going to be impressive.

Friday, October 30, 2009

Still more Halloween stuff

A coworker of mine ordered two 6" pumpkin cakes (that is, cakes shaped like pumpkins, not cake tasting like pumpkin) for today.  It was an interesting challenge to make them, since I had to improvise a little bit.  My first plan was to make them with mini bundt pans, to produce mini versions of the cake pictured here.  Unfortunately, that had to change when I found out I couldn't get 6" bundt pans for less than $30 each.  Which, by the way, is outrageous.  So I had to do some last minute improvisation.

First thing I had to do was figure out if I was going to carve the pumpkins out of normal cake rounds or if I was going to shape the cake before baking.  Carving cakes seems to go best when the cake is frozen.  Considering my limited experience carving cakes (and limited time), I opted for the latter option.  This also gave me an excuse to use one of my new baking pans!


The pan on the left is essentially a metal bowl, and any oven-safe bowl will work for this.  Using one produces cakes like this:


which can then be stacked like this:


(Remember to carve a spot for the stem!)
frosted like this:


and topped with some of these:


to be made to look like this:


The stem, vine, and leaf were made of marshmallow fondant, and the rest was orange buttercream.  
I think it's cute!

Tuesday, October 20, 2009

Apple Pie

First I must disclose: I have decided I am utterly in love with Cooks Illustrated (and their TV show, America's Test Kitchen).  Any time I want to try a new recipe or am having trouble deciding what variation to choose, I just use theirs.  As yet, I have not been disappointed.

That being said, now onto the business at hand: Pie.  Pie makes me anxious.  Every year I attempt it, with varying degrees of success.  Sometimes the crust is too tough, sometimes the pie has soggy bottom syndrome, sometimes the fruit is underdone or sometimes it doesn't set...the list goes on and on.  It is for this reason that I reserve pie almost exclusively for special circumstances during the fall season.  There is just something so tricky about the balance between structure and tender flakiness combined with a juicy, heavy fruit filling---- I simply cannot seem to master it.

I love pie.  For that reason I soldier on, year after year, in my (often vain) attempts at getting it right.  I use a shortening "water barrier" on the bottom crust to insure against soggy bottoms, add extra starch to help the juices set, work the crust as little as possible to prevent toughness, and constantly second-guess the doneness inside that golden top crust.  But somehow it always eludes me-- that perfect piece of pie.  I speak, of course, of the double-crust fruit pie.  Other pie variations I can handle without losing too much sleep.

One of my "special occasion" pies every year is a fresh apple pie made from apples obtained from the orchard itself.  Usually this is a pick-them-myself venture, but this year was apparently a bad apple year so I had to settle for a farm stand on the orchard property instead.  It is one of the things that symbolizes the essence of fall for me. 

This year, I tried a new crust recipe from (lo and behold!) Cooks Illustrated.  It is unique because it calls for vodka (or other 80 proof alcohol).  I just happened to have AppleJack on hand (from my last apple pie attempt), which is a brandy made from apples and which also happens to be 80 proof.  I used that instead of the vodka.  This recipe was purported to produce an extremely flaky crust, due to baking science I will not go into except to say that the vodka does not interact with the starch in the flour to produce gluten (which makes dough tough when you work it too much).  It also evaporates at a lower temperature than water, meaning the crust will dry out faster, thus not getting soggy.


I am quite pleased with the texture of the crust, although I wish I had used an egg wash since it is a little bit too pale for my liking.  I attempted to fix that with a short stay under the broiler, but the stay was just a hair too long and the top got a little too brown:


It still tastes fine, but next time I will just use an egg wash and be done with it.  The crust is quite flaky and very structurally sound, both of which are very good things.  Overall, I think this will be my go-to pie crust recipe (unless I find something better).

As for the filling...I'm not quite sure where I got the recipe, or if I just jumbled bits and pieces from a bunch of them, but I am not sure how I feel about it.  I used Jonagold and Ida Red apples for this pie, and I guess they were not particularly juicy because the recipe I had called for 5 pounds of apples, but even mounded up I could only fit 3 pounds' worth in there.  Perhaps my recipe was for a deep dish pie and I did not notice.  Anyway, that is why this pie is a little...bulgy.  For the filling recipe I was not as careful as I normally am-- I believe I put in about 2/3 cup of sugar and one heaping 1/2 teaspoon of apple pie spice in there along with the apples.  I wish I had added more of everything!  The tart Ida Reds were a little too tart, and while the appley flavor of this pie is nice, I miss the notes of flavor contributed by the cinnamon and nutmeg-- they were just overshadowed by the apples, somehow.  I also drained some of the liquid (concern for soggy bottoms), which I will not do next time, as the pie could benefit from some juicy goodness.  I think next time I will experiment with using some brown sugar instead of all white-- I think the molasses will contribute nicely to the flavors.


 It's not a bad pie-- in fact, all of the things I was worried about turned out just fine!  The crust was easy to work with and in many ways perfect, the apples were done enough and it wasn't soggy or drippy or anything like that.  But, what I didn't worry about I played a little too loosely, because the flavor of the filling I expected to pretty much take care of itself, and next time I know to pay more attention to that.

Perhaps the perfect apple pie is within reach after all?  I will try this crust recipe again at the other special fall occasion: Thanksgiving.  If it turns out as well then, I will definitely keep this recipe in my repertoire for the future. 

Saturday, October 17, 2009

Halloween Display

The caterer I work through wanted me to make some faux cakes and cupcakes to help her promote her new website, creepyfeast.com.  She is going to display them in 4 Whole Foods stores throughout the LA area, so they needed to be made of materials that would not go bad or need to be refrigerated.

This made for many unique challenges.  First and foremost:  how to construct fake cakes and cupcakes?  I found some varying techniques online, calling for everything from plaster of paris to styrofoam, but they all sounded rather complicated.  Thankfully, people construct cake and cupcake "dummies" for just this purpose!  The cupcakes were quite difficult to find, so I ended up having to order them online:


Little styrofroam shapes pre-glued into cupcake liners-- these babies saved me quite a bit of hassle.  For the cakes, however, I decided to construct my own cake dummy out of dry floral foam blocks, like so:


The blocks were glued together with a little bit of royal icing, which dries completely hard and does not need to be refrigerated.  That, along with Marshmallow Fondant, were the only frostings suitable for display cakes-- which was a challenge in and of itself, since I don't have much experience with royal icing.  I would have much preferred to work with buttercream, but it isn't as stable and is more prone to damage.

So, first I made 2 dozen cupcakes of assorted Halloween varieties, all of which are available on the Creepy Feast website.  The designs I chose were:  Ghost with pumpkin, Vampire, Monster, "Slug", Centipede and Mummy.  Because there are 4 locations she is displaying these, she requested 4 sets of 6 different cupcakes.  I didn't take any progress shots of these, but here is the finished product:


These little suckers took SO much time to do...especially since each style required different colors, materials and techniques.  The mummies and the ghosts are my favorites.

So, after finishing the cupcakes I had to tackle the cakes, which were taken from this design:


However, this cake is frosted in buttercream, which I did not have at my disposal, so some alterations had to be.  I also had to make 2 of these.

So first off, I covered the face part of the cake in green fondant:


For the hair, I used black fondant and white royal icing, mainly because I did not have enough of either one to do it entirely one way or the other, and I didn't want to have to make more frosting because all my bowls were dirty and it was 1 in the morning already. 

First I smeared on a thin layer of royal icing on one surface of the "cake" so that the fondant would stick.  After applying the fondant, I went back and filled in the spaces with more royal icing.  I really lucked out with my management of supplies with this whole project-- at the end of it, I had a golf-ball sized amount of black fondant left and that was it.  Everything else was used up completely.


The face is almost entirely fondant-- the whites of Mrs. Frankenstein's eyes are flattened marshmallows, but everything else is fondant.


By the time I had finished, it was 4 AM (these were for a pickup Saturday morning), and this was the state of my kitchen:


I was rather annoyed after staying up so late to make sure everything was done this morning, the caterer decided (at 7:30 this morning) that she was going to pick them up tomorrow morning instead. 

Gah!!

Thursday, October 15, 2009

Pretty pretty dragonflies

I had an order for 3 dozen cupcakes like this:


 They wanted half chocolate and half yellow cake, which comes out to 18 cupcakes of each, so I made two batches of 24 cupcakes to ensure I had enough.  Good thing, too, because the first batch had a few cupcakes that were too close to the walls of the oven and they....became significantly overdone.  Anyway, due to my ingenious planning, even with this mishap, I had enough cupcakes to fill the order.

The next issue was finding dragonfly toppers for the cupcakes.  The caterer said they were willing to pay for the exact cupcake picks pictured above, so I had to find them.  I couldn't find them in any store near me, unfortunately, so I had to turn to the internet.  Also significant is the fact that this order was solidified on Monday...so there was some haste necessary.  I finally found them at a lovely baking resource that I will certainly purchase from more often, now.  So I placed the order on Monday (a holiday), and priority mail claimed 2 day delivery.  They were delivered today, just in time.  There was minor panic when I checked online this morning and they still had not been delivered, but the box was there waiting for me when I got home from work.


(Hard to see, I know)

 Anyway, after the picks were safely received, I whipped up a batch of buttercream and frosted the cupcakes in the closest approximation of the picture that I could.


The blue color comes compliments of Wilton.  Their "airbrush in a can" is perfect for people like me who want the effect but cannot afford to purchase a food-grade airbrush machine and dye.


Works like a charm.  So after a quick spray with this, all they needed were some extra buttercream clouds and the dragonflies!


Now time to work on some halloween cupcakes for tomorrow.  More soon!