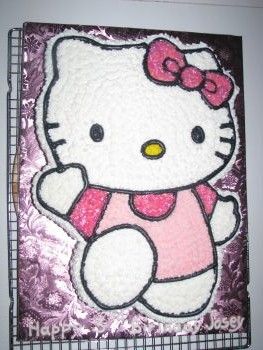
So, for those of you not "in the know", this is Hello Kitty:
She's quite cute. I was asked to convert her into cake form for a birthday party, a task that my research on the internet has lead me to believe is deceptively difficult.
Due to the presence of a Hello Kitty molded cake pan of just her head, the majority of designs were only her disembodied head. I love her little body, so a decapitated kitty mine would not be. I also knew I wanted a dynamic pose, because there is something unappealing about eating a cake of a character laid out like a corpse.
Already I had significantly narrowed down the number of available options to use as inspiration. There were still a few very good Hello Kitty cakes out there, but most were far too much work for the rate I quoted. Of all of the research I did, only this one => struck my cake-baking fancy. The clean lines and bright colors are such a perfect representation of Hello Kitty in all of her adorableness, I knew this was the design I wanted to emulate.
However, I hate star-tipped frosting like this design had. It makes my hand hurt from individually piping each little star, and since this was going to be no small cake I dreaded the idea. Plus, it makes everything fuzzy looking...which can be a good thing, depending on the design, but Hello Kitty isn't fuzzy. Nope, I had to change the frosting technique.
So, first I had to bake two 9x13 vanilla cakes, which was an endeavor all on its own since I only have one straight-sided 9x13 pan and to fill it properly takes the equivalent of 1.5 normal batches of cake batter (7 cups). I made a triple batch of batter (which filled my new mixer bowl to the top, I might add), and weighed it to make sure I divided it evenly. Baked half, depanned and then baked the second half. I had some anxiety about the texture of the cakes being off after letting half the batter rest for 45 minutes before baking, but it doesn't seem to have made a difference, thankfully.
I then let both cakes cool overnight wrapped in plastic. The next day I leveled, split and filled them with a strawberries and cream filling. Next came the carving. Carving will always make me nervous, no matter how long I do it, I think. And this one wasn't even that hard because it was only 2-dimensional! So, to alleviate some of that anxiety I came up with a plan to ensure I get all of her proportions right. The cake I was using was made up of two 9x13 cakes pushed together to make one 13x18 cake. I printed out a picture of Hello Kitty spanning 2 pages of paper equaling 11x17, taped some wax paper to the back and cut around her to use as a template. The result:
The bowl on the left hold scraps of filled cake I carved away to make her body. The bowl on the right consists of scraps from the leveling process. By the end of it, though, I had a pretty good outline of Hello Kitty to use as a basis for the rest of my decorating. You can see the seam of the two cakes by her chin.
Now I had to crumb coat the newly-exposed edges I had cut away and then frost all over. The frosting I used was a little bit too thick to work with easily, and I wish I had thinned it down before working with it. That, and the juices from the strawberries I had cut through when carving were making it kind of melty and hard to work with around the sides. Still not sure how to get around that issue, really.
After preliminary frosting, Kitty looked like this:
Kitty, you're naked!
I didn't take any pictures of the decorating past this point (I tend to get "in the zone" and "covered with frosting" which makes taking photos difficult to remember and difficult to execute).
I had thought that I didn't want to use a round tip to do her outline because getting a sufficiently thick line would necessitate huge pipes of frosting, but looking back on it I wish I had. Getting all of the curves smooth and precise was very difficult with the tip I chose, and would have been much easier with a round tip.
 Here is the end result:
So, not a bad job in the end. Lessons learned: Use thinner icing, and use a round tip when outlining.


